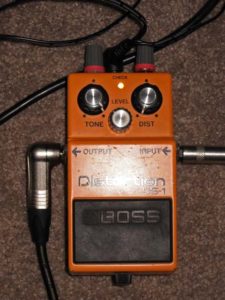
Modding the DS-1 – part 3 – have I gone too far?
After my second stage of modifications I had found that my pedal was sounding absolutely amazing, especially as an overdrive for my amp’s dirty channel. However, I wasn’t completely happy with the the range on the tone knob. I went from extremely thick and bassy, to just in the range I would want o set my tone to. I wanted to see if I could replace a couple of components somewhere to give me the ability to set my preferred tone setting to somewhere around the middle of the dial.
I did some searching on the ‘net for any solutions to my problems, and found some information relating to the resistors taking care of the tone control, and using pots in place of them to gain variable control on the tonal palette.
So I decided that my third stage of mods to the DS-1 was to remove the resistors related to the tone stage of the pedal, and replace them with 2 10K matching value pots to give the ability to shape the curve of the tone knob.
My first test was adding two cheap trim pots in place of the resistors that I could just shove in the casing after tweaking. I had found some success with this method, and I was able to tweak the tone stage so that my preferred setting was around 12 o’clock on the tone knob.
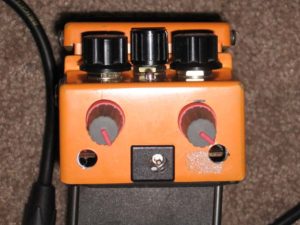
My next step was to actually install 2 pots on the outside of the pedal so I could alter the tone to suit whatever guitar I was playing. I picked up two 9mm 10K pots, and a drill bit to drill through the case so I could install them.
There is not a lot of room in the DS-1 for installing extra pots so I was going to have to “uglify” the pedal a bit to install the two pots. I ended up choosing the top side of the pedal, either side of the AC adapter port. I figured that then the new controls wouldn’t get in the way of other pedals when on a pedal board.
Now there is a saying, something along the lines of “measure twice, cut once”. This is perhaps something I should have done when it came to drilling the holes for the new pots.
I measured the spots to drill, and there was plenty of clearance for the pot to fit, so I drilled and that was where I realised my mistake. I had forgotten about the screw points for the base plate in each corner. As a result I couldn’t get the pot in far enough to be able to screw on the nut.
So I measured up again, and this time successfully managed to install the new pots behind the stock ones. I did have to pull out the stock ones in order to get them in.
Unfortunately it was at this point when I found some more problems. My stock tone knob seemed to be doing very little, and the new pots weren’t quite doing what they were when there were just little trim pots installed. I tried rewiring it all again, and at that point accidentally took the solder base off one of the resistor points. I write out the wire glue and put it all together, and still didn’t really have any success. Things seemed a bit worse again.
I decided to remove the new pots, and install the original resistors again, with the hope that I’d get the pedal back to my stage two mods. I was unable to get any winning results though as my tone knob still wasn’t reacting properly, plus the level seemed to be failing too. 🙁
Looks like I have a bit of troubleshooting ahead of me. I hope I can manage to work out how to fix the problems I have.
I’m kind of wishing that I held off the stage 3 mods until I had a new more accommodating enclosure where I could fit the new pots more comfortably.
Wish me luck!


Leave a Reply