
Modding the Daphon E20OD

I had mentioned in my review of the Daphon E20OD Overdrive that besides it’s use of the same chip as the Ibanez Tubescreamer, the E20OD was pretty much a replica of the Boss SD-1 Super Overdrive. The PCB layout and components is pretty much exactly the same, which makes it incredibly easy to modify the E20OD in much the same way as the Boss unit.
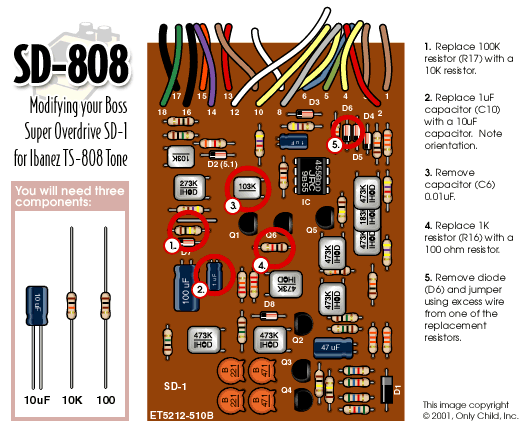
I thought I would try out the “SD-808” mod that has been on the Internet for some time. it is a nice simple mod with only three new parts, and the removal of a couple of other parts.
One of the parts that is removed is one of the three diodes that create the clipping stage. This is to change the clipping style from the Boss SD-1 asymmetrical type to the Ibanez Tubescreamer symmetrical type.
I decided that I wanted to be able to switch between the asymmetrical and symmetrical styles, so I installed a switch to go between the asymmetrical Boss style clipping, and the symmetrical Tube Screamer style clipping.
Installing a SPDT switch to go between symmetrical (Ibanez Tubescreamer) and asymmetrical (Boss SD-1) clipping
This is what you need to do to install the SPDT switch:
- VD2: – Remove stock diode. Take note of orientation.
- Solder to left pin on SPDT switch, negative (black line) to switch.
- Solder wire (blue) to other end of diode
- Solder wire (red) to middle point on SPDT switch.
- Solder wire (black) to right point on SPDT switch.
- Solder the ends of the blue and black wires together, leaving one end longer.
- Solder the merged wire to the spare hole in the PCB where the triangle points (bottom).
- Solder the red wire to the remaining spare hole (base of triangle).
The cool thing with the E20OD is that there is a hole just the right size for the SPDT switch already drilled in the enclosure below the tone knob. All you need to do is take a Stanley knife or something similar to the yellow plastic label, and cut a hole in it.
So after installing the SPDT switch it was just a matter of replacing some components to complete the “SD-808” mod.
 “SD-808” mod for the Daphon E20OD
As per the image, the new components required for the “808” mod are:
- 10uF electrolytic capacitor (I substituted a 10uF tantalum capacitor for less leakage/quieter operation)
- 10K metal film resistor
- 100 Ohm metal film resistor
Whilst the E20OD is almost a clone of the Boss SD-1 the components are labelled differently. The changes on the E20OD are as listed below:
- R14: – Replace 100K resistor with 10K one
- C12: – Replace 1uF Electrolytic capacitor with 10uF Tantalum capacitor
- R12: – Replace 1K resistor with 100ohm one
Further tonal changes
One of the things that I didn’t like too much with the E20OD is that it adds a lot of treble to the tone. Even with the tone rolled all the way back my tone still had extra unwanted treble added. I like an overdrive that can be dialled in nice and neutral, so it just pushes the amp a bit more, without colouring the tone too much. This is something I loved about the Digitech Hardwire CM-2 Tube Overdrive. I could set the CM-2s’ tone control to 12 o’clock, and the tone I got with the pedal on was just the same as with it off, but with the added gain.
So my plan was to hopefully modify the Daphon pedal to have these sorts of qualities, as well as remove some unwanted noise. I did some scouring over the Internet to find as much information on mods that people had made to Boss SD-1 and came up with the following changes:
- C19: Replace 1uF electrolytic capacitor with 1uF tantalum capacitor, note negative orientation. This reduced some noise introduced after switch addition.
- C3: – Replace 0.047uF Capacitor with 1uF plastic (green cap) or metal film (MKT) capacitor. this gave a little more low end when switched to asymmetrical clipping.
- C17: Replace 0.01uF green cap with 0.1uF green cap capacitor. This rolled off the treble and added a little more compression.
After all of this I came up with an overdrive circuit that I’m pretty happy with. I still need to play with the tone circuitry a little as I want my neutral tone to be closer to 12 o’clock, and currently it’s around 9-10 o’clock on the tone dial. There is still a little bit of noise that I would like to get rid of. The sound I’m after though is there for the most part.

New clothes
I decided that I would also move my newly modified overdrive into a new Hammond-style enclosure, which I could decorate to suit my custom pedal. I have some ideas for this, so hopefully I will have the final product done soon.
I used all of the jacks and potentiometers that the E20OD came with, but I needed to install a new stomp switch. This is a simple enough process though. All I needed was an SPST momentary ON footswitch. Remove the wires from the stock E20OD switch, and solder to the new switch, and everything works as it did in the old enclosure.
To ensure that the PCB didn’t short out on the metal lid of the enclosure I got some rubber sheeting, and had it cut to size to sit in the lid. This sits perfectly in the lid, and didn’t even need be glued on.
I came up with one problem with the install, and that was that some of the components were too tall to fit comfortably in the enclosure! I used a template I found on the Internet to drill everything, but didn’t take into account if they would be in the way of components on the PCB!
For this prototype (I’m thinking of building a better 2nd prototype) I ended up cutting out a rubber gasket of sorts to go around the edge of the enclosure to space it out a bit from the lid, giving me a bit more room for the PCB.
I have found this modifying experience to be a great stepping stone between modifying a standard pedal, and building a pedal from scratch. Turning a dirt cheap pedal into something a little special costs you a little bit of money, but what is learned from doing this is an invaluable thing.
Once again a big thanks goes out to cubisteffects for kindly helping me out with any questions I had regarding things like switches, and modifying parts of the circuit.
Leave a Reply to Rory Cancel reply